WordPress is one of the most common content management systems worldwide. Thousands of websites are developed using WordPress because it provides an enhanced user experience through its simple but intuitive design.
WordPress is the number one choice of web designers and developers because it is effortlessly sophisticated; it is easy to use, and yet it provides a professional-looking interface. However, traditionally, the login page of a WordPress site is quite generic. Imagine that you are a registered member of a site, and you land on a generic login page. It will make you feel less inclined towards the website, and your user satisfaction will plummet.
On the other hand, imagine landing on a login page that has been customized to show the business’ unique aesthetics and USPs. Not only will such a unique page show the originality and personality of the brand, but it will also show their dedication to their consumers. A customized signup page that is well-integrated with the interface improves the user experience and increases the number of clicks, which significantly uplift the website.
Here, we explain how you can design a beautiful, simple, and clean login page that goes with the unique theme of your website.
Table of content
Custom WordPress Login Form Development
There are two ways to develop a customized login form using a flat user interface; one is with a plugin, and one is without. We will explain bot methods one by one:
Form Development with Plugins
Step 1: Create a Plugin Directory Folder
First and foremost, create a folder by the name of the Plugin Directory; you will store all the plugin files in this folder for easy access and organization.
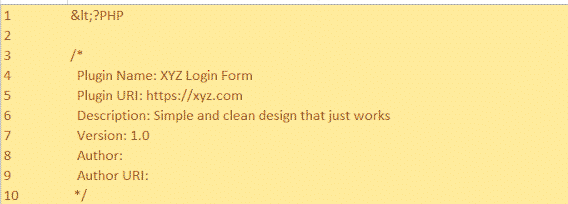
Once you have created the folder, use the following plugin header:
- Step 2: Download The Flat UI Component
Now, download your chosen Flat UI framework in the plugin folder. Once downloaded, you can extract the file to obtain the bootstrap, font, and CSS folders. The next is to copy these folders to the plugin directory folder you created in the first step. You can customize the font and other elements according to your theme and your requirements.Once done, use the following dlf form PHP function that contains the HTML code for the Login Form: 
Step 3: Authenticate The Username And Password - Step 3: Authenticate The Username And Password
When you land on the login page, you must provide a valid username and password. If you fail to do so, the page gives you a notification that the username or password is incorrect. Therefore, the username and password authentication functionality are essential to a login page.
You can integrate the authentication function by using the dlf_auth () function in your Flat UI login form. Here it is:

- Step 4: Front End Display
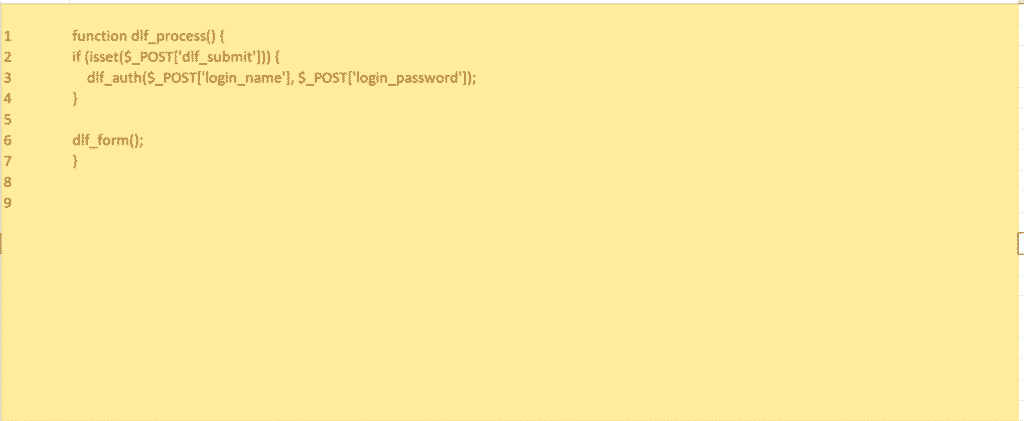
Now, using the dlf_process function, integrate the login form to the front end. Two things will happen when you run this function firstly, it will authenticate user id and password, and secondly, if validated, the user will be directed to the admin dashboard. If the user name or password is incorrect, the system will show an error notification to the user and prompt to resent the password.
Here is the process function:
- Step 5: Attach the CSS and Bootstrap files to WordPress Header
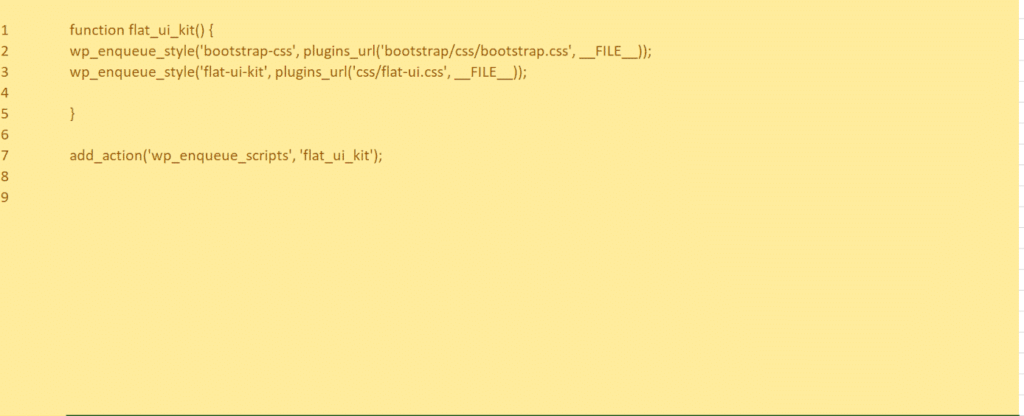
To give your login page interface a clean and customized look, you will need to attach the customized CSS and Bootsrap to the WordPress Header using the following function
- Step 6: Embed the Login to WordPress
Finally, use a shortcode to embed your customized login page to your WordPress site. Use the code given below to embed your login form easily:
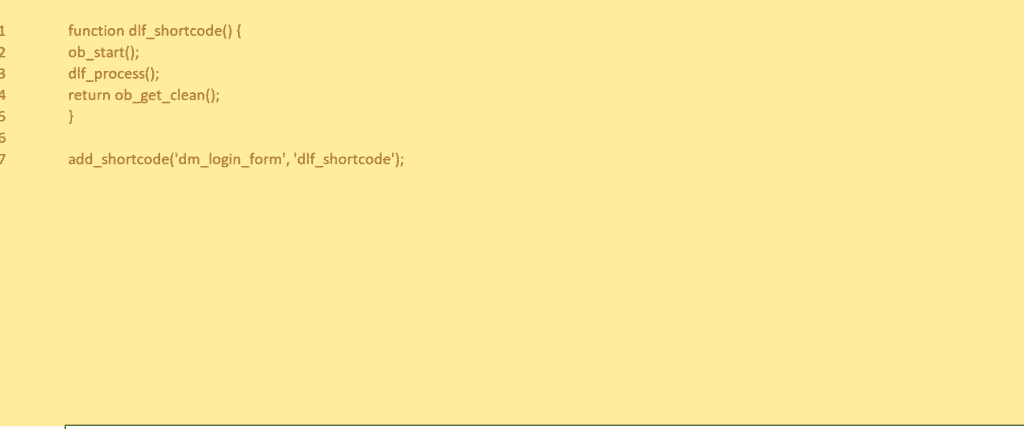 Here you have it; your customized login page is complete!
- Step 2: Download The Flat UI Component
Form Development Without Plugins
Another way to add a customized Flat UI login page is without the help of plugins. What you need to do is to create a separate stylesheet for your customized login page. Once you create this stylesheet, you can add it to your WordPress theme.
Here are the simple steps that you need to follow:- Step 1: Create a Folder Labeled Login
Make a folder in the theme folder of the website and name it “Login.”
Add a .txt file in the folder and name it “custom-login-sheet.css.” - Step 2: Change the Background
You can change the background image by selecting the background-image code line: URL (logo_login.png’) and then replace the (logo_login.png) with the file of your choice. You can add your business’s logo to create a better impression on your users and help them remember your brand.
To personalize the login page, you can do a few things:- Change the background color: Decide the color that you want, get the color code, and then change the hexa code to match your chosen color. We suggest that you choose a color that compliment’s your business’ vibe and aesthetics. Some colors are proven to generate specific responses; therefore, keep the psychology of colors in mind when you choose colors for your background.
- Change the background image: You can change the background image by selecting the background-image code line: URL (logo_login.png’) and then replace the (logo_login.png) with the file of your choice. You can add your business’s logo to create a better impression on your users and help them remember your brand.
- Change the background color: Decide the color that you want, get the color code, and then change the hexa code to match your chosen color. We suggest that you choose a color that compliment’s your business’ vibe and aesthetics. Some colors are proven to generate specific responses; therefore, keep the psychology of colors in mind when you choose colors for your background.
- Step 3: Adjust the Padding and Margins on the Login Page
We can also update the login page UI by changing the padding and Margins of the page. It helps adjust the form to your design specifications and make the UI more attractive. You can increase or decrease padding to make the font appear wide apart or close together. Similarly, you can increase or decrease the margins to increase spacing outside the button.- Step 4: Customize Font and Color
You can also customize the font size by increasing or decreasing the font in the code. Similarly, you can change the text’s color by choosing the hexa code of the color of your choice. - Step 5: Modification of Login Error Message
The final step is to modify the login error function as it is vulnerable to hacking attempts. Change the PHP function is the source code to keep these malicious hackers at bay and protect your data.
- Step 4: Customize Font and Color
- Step 1: Create a Folder Labeled Login
Wrapping it up
WordPress themes are the go-to for most designers; however, a generic login page can put off consumers. Web designers can customize a WordPress theme’s login page to match their brand’s style, engage consumers, and generate more impressions. You can use a with or without plugin approach to create a personalized login page that is safe and aesthetically pleasing.
Did the method work for you? Let us know your preference in the comments below!
Also Read: Top 5 Contact Form Plugin For Your WordPress Website 2020

